A Raspberry PI - Wii Blance Board - Game Controller
Intro:
I’m working on a Room-Scale VR Project and was looking for a way to use the Wii Balance Board as a “cheap” mode of locomotion. After doing some research (googling) I discovered that there were various programs, drivers, etc., that attempted to turn a Wii Balance Board into a PC game controller. Unfortunately, they didn’t work well on my system. Since I already had an old Raspberry Pi Model B sitting around, I figured I should be able to use that, along with a few other components, to create a plug-and-play Wii Balance Board game controller. Here were the requirements:
- Low Latency: It needed to be fast enough to register movements without any perceptible lag in response.
- Omni-Directional: All directions needed to be represented, including diagonals.
- OS Agnostic: It had to be truly plug-and-play and work consistently, with no changes, across all operating systems.
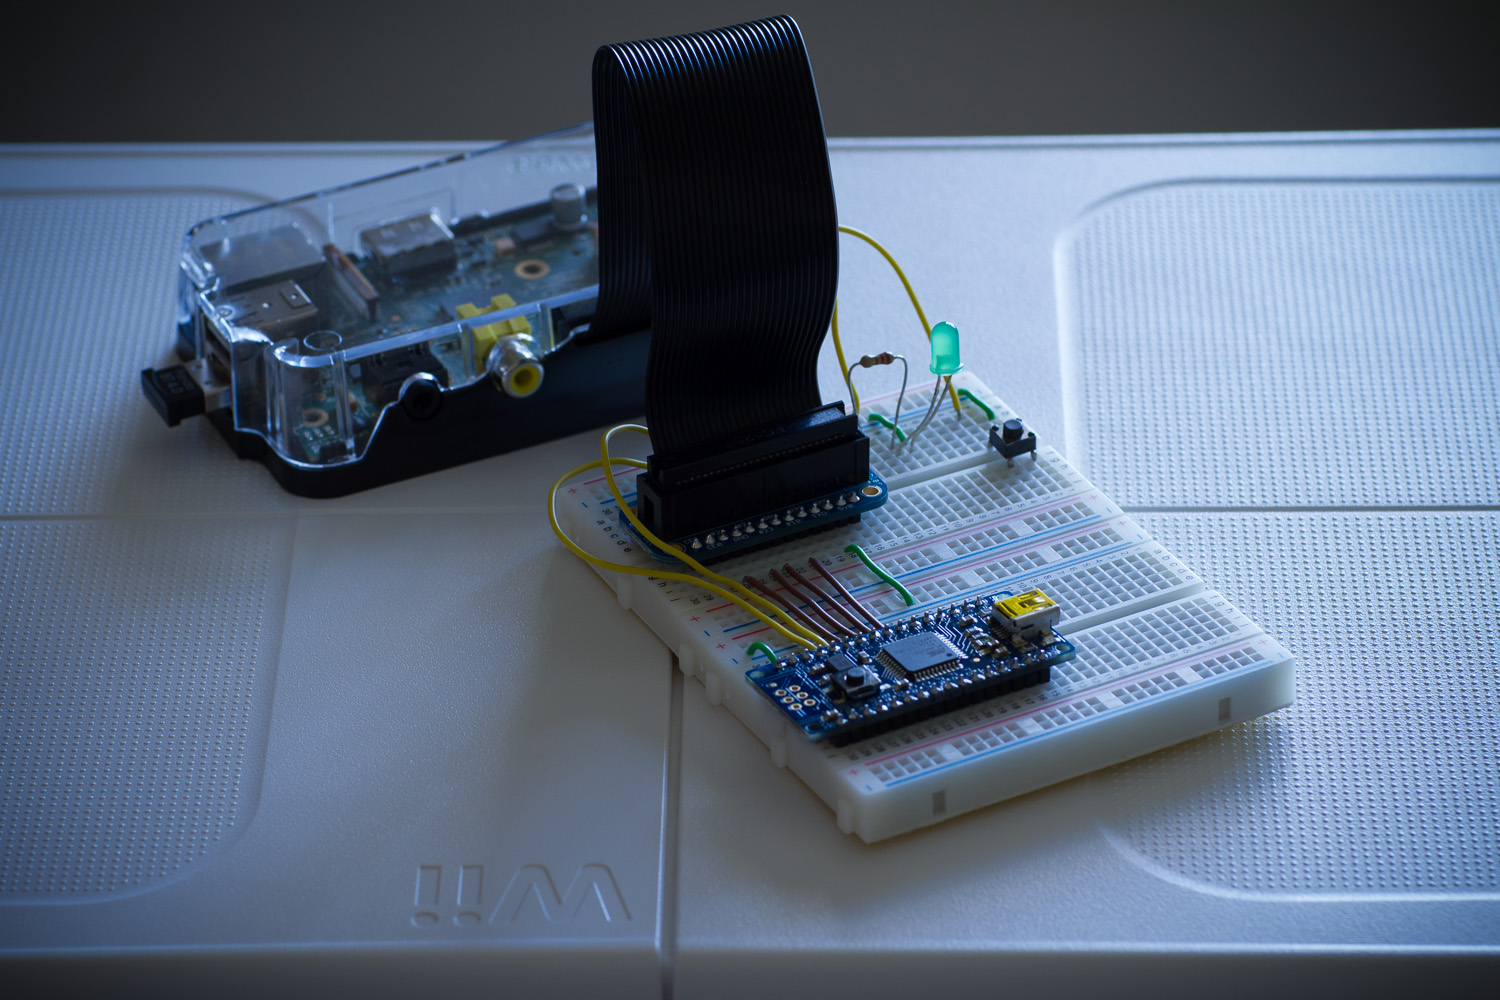
Parts:
I already had most of the parts, minus the Atmega32u4 Breakout Board and the Bluetooth dongle, but here’s what I used:
- 1 Raspberry Pi
- 1 Pi Cobbler Breakout + Cable (I’m using the 26 pin connector with my Model B. Newer models will need the 40 pin connector, or this can be skipped altogether and connections can be wired directly to the Pi’s GPIO Pins)
- 1 Bluetooth Dongle (Panda Bluetooth 4.0 USB Nano Adapter)
- 1 Atmega32u4 Breakout Board + USB cable - A/MiniB
- 2 Half-Sized Breadboards
- 13 Jumper cables of various sizes
- 1 Diffused 10mm Green LED (got this a while back in an assorted pack)
- 1 Resistor 330 OHM
- 1 Tactile Button
Connections
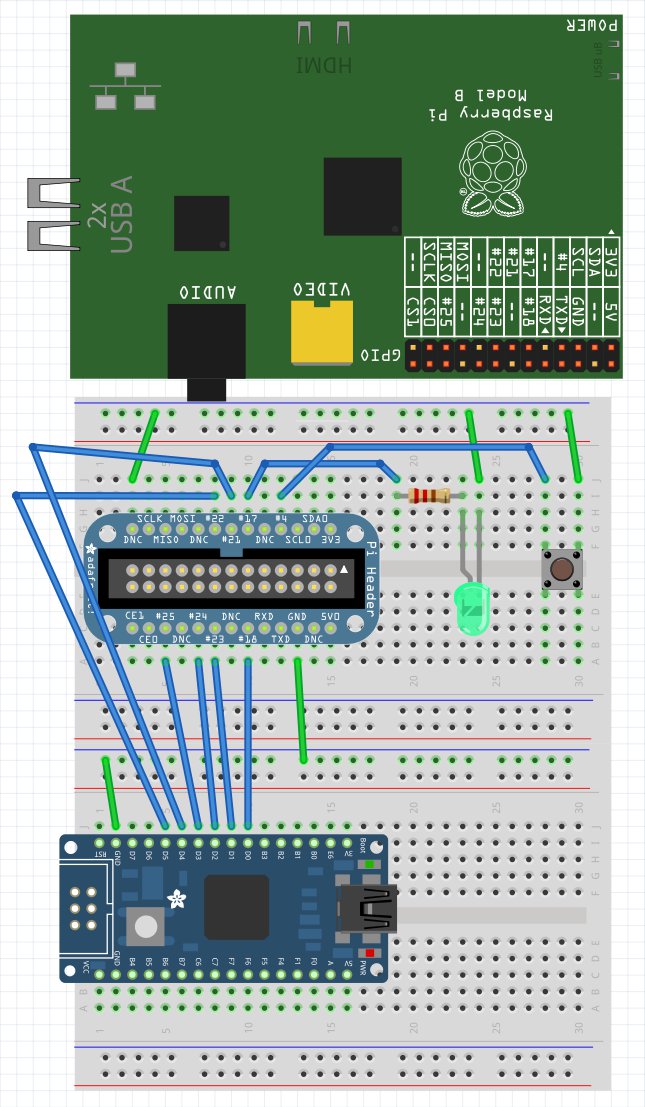
- Button -> Pin 4: Our only input pin on the Pi is this multi-purpose button. Its functions are:
- starting the main app
- resetting the Bluetooth dongle when/if necessary
- shutting down the Pi
- Pin 17 -> 330 OHM -> LED: This is our status light. It flashes and flickers to let us know what’s going on.
- Pin 18 -> D0: Move Right - sends the “d” key
- Pin 23 -> D1: Move Down - sends the “s” key
- Pin 24 -> D2: Move Left - sends the “a” key
- Pin 25 -> D3: Move Up - sends the “w” key
- Pin 21/27-> D4: Sprint - sends the “left shift” key
- Pin 22 -> D5: On Board - sends the “o” key
The main interaction between the Pi and Atmega32u4 is very straightforward. The Pi sends “high” to the Atmega32u4’s D0-5 input pins, and the Atmega32u4 reacts by acting like a keyboard, sending the corresponding keys to the connected computer.
Setup:
To keep things simple, I started with a clean install of Raspbian Wheezy and then proceeded with an update, upgrading and installing the additional packages I needed.
sudo apt-get update
sudo apt-get upgrade
sudo apt-get install bluez python-bluez python-gobject python-dbus avrdude
sudo shutdown -r now
Briefly, here’s what the additional packages do for us:
- bluez: The Bluetooth stack
- python-bluez: Gives python access to the Bluetooth resources
- python-gobject: Allows us to listen for events triggered by Bluetooth devices
- python-dbus: Facilitates with the Bluetooth communication (This may already be installed, but it doesn’t hurt to include it in the apt-get)
- avrdude: Allows us to upload our keyboard controller to the Atmega32u4
Next, create a “wii” folder in the Pi’s home folder and download/unzip the files into it:
mkdir wii
cd wii
wget http://reducedgravity.net/wiipi/wiipi.zip
unzip wiipi.zip
File Overview:
- wiiConfig.py: An include file, which provides access to the configurations.
- wiiConfig.ini: The configuration file used for making minor adjustments.
- wiiBoard.py: The main app used to communicate with the Wii Balance Board and send output to the Atmega32u4 Breakout Board.
- wiiBind.sh: A script used, hopefully only once, to bind/pair the Wii Balance Board with/to the Raspberry Pi.
- usbreset: A c program used to cycle the Bluetooth USB dongle.
- startup.py: The app responsible for starting up and shutting down all other apps.
- README.md: The text version of this file.
- Keyboard.hex: The keyboard controller we’ll send to the Atmega32u4 via AVRDude.
- bluereset.sh: A convenience script used to help run the usbreset program.
Bluetooth
With all the files in place, it’s time to setup the Pi’s Bluetooth connection to the Wii Balance Board. Flip the Balance Board over, remove the battery cover and press the little red sink button. While the Balance Board’s power light flashes, run:
hcitool scanScanning ...
34:AF:2C:2C:EB:A9 Nintendo RVL-WBC-01If everything went well you should see the “Scanning…” message above along with the MAC address (e.g. 34:AF:2C:2C:EB:A9) of the board. The address is important and unique to each Balance Board, so don’t lose it. We’ll use it to connect the Pi to the Balance Board. Copy that address and add it to the wiiConfig.ini file. There’s already one at the bottom of that file, so just find it and replace it.
To copy the MAC address into the wiiConfig.ini file, run:
nano wiiConfig.ini# Store the Wii Balance Board's MAC address
ADDRESS = 34:AF:2C:2C:EB:A9 ; This MAC address is unique per board (change required)…press ctrl x, then y, then “return” to save the changes
Next run the wiiBind.sh script with the same MAC address we collected above:
sudo ./wiiBind.sh 34:AF:2C:2C:EB:A9Removing device...
process 2462: arguments to dbus_message_iter_append_basic() were incorrect, assertion "_dbus_check_is_valid_path (*string_p)" failed in file ../../dbus/dbus-message.c line 2604.
This is normally a bug in some application using the D-Bus library.
ERROR:dbus.connection:Unable to set arguments ('34:AF:2C:2C:EB:A9',) according to signature u'o': <type 'exceptions.MemoryError'>:
Traceback (most recent call last):
File "/usr/bin/bluez-test-device", line 85, in <module>
adapter.RemoveDevice(path)
File "/usr/lib/python2.7/dist-packages/dbus/proxies.py", line 145, in __call__
**keywords)
File "/usr/lib/python2.7/dist-packages/dbus/connection.py", line 641, in call_blocking
message.append(signature=signature, *args)
MemoryError
Device removed, press any key to continueYou may notice an error (ERROR:dbus.connection…). That’s because a device with the address we provided wasn’t found. You can safely ignore the error. If for some reason you need to run this script again, you won’t see that error, because it’ll find it and remove the device instead.
…As you continue you should see:
Please press red sync-button on the back of the wiimote and press any key
to continue
If this asks you for PIN input, then your bluetoothd daemon does not
include the wiimote.so plugin. Please install it or contact your distributor.

New device (/org/bluez/2203/hci0/dev_34_AF_2C_2C_EB_A9)
Please disconnect the device by removing a battery and then press
any key to continue
btw: after you remove the battery, put it back in… ;)
Now press the red-sync button again and press any key to continue

Pairing with the remote device...
Release
New device (/org/bluez/2203/hci0/dev_34_AF_2C_2C_EB_A9)
Connecting to input device...
Trusting the remote device...
Connected to input device. Autoconnect should be enabled now.
If all went well, the power light on the Wii Balance Board should be on. Congratulations, your Raspberry Pi is now paired with and connected to the Balance Board. If you were to restart the Pi and then press the Balance Board’s power button it would flash then stay on, but let’s not do that just yet.
Now is a good time to test out the bluereset.sh script, because pressing the power button on the Balance Board won’t disconnect it from the Pi or shut off the Balance Board, but running the bluereset script should.
sudo ./bluereset.shBus 001 Device 004: ID 0a12:0001 Cambridge Silicon Radio, Ltd Bluetooth Dongle (HCI mode)
001/004
Resetting USB device /dev/bus/usb/001/004
Reset successfulIf that went well, you should see the message above and the Balance Board’s power light should now be off. If you want to test it again, press the Balance Board’s power button, wait for a solid light, then run the script again and watch it go off.
btw: If you haven’t already, you can put the battery cover back on, we’re all done with that stuff.
AVRDude
Now it’s time to program the Atmega32u4, and we’ll do that with AVRDude. This is honestly one of the easiest steps in the whole process. Simply connect the Atmega Breakout Board to the Pi via USB, press the Breakout Board’s button and then (within the first soft pulses of the Breakout Board’s red LED) run:
avrdude -p atmega32u4 -P /dev/ttyACM0 -c avr109 -U flash:w:Keyboard.hex...
avrdude: verifying ...
avrdude: 4504 bytes of flash verified
avrdude: safemode: Fuses OK (E:C3, H:D0, L:FC)
avrdude done. Thank you.If all went well you should see the message above. However, if it didn’t work, it may just be a timing thing. If you press the Breakout Board’s button and then run AVRDude immediately or take too long to run it, it will fail. I like to have the command ready to go. Then I press the Breakout Board’s button and run the command with the same finger, going first to the Breakout Board, and then to the keyboard’s return key. This usually helps me hit the timing sweet spot.
Testing
With the files in place, our Bluetooth connection setup and the Atmega32u4 Breakout Board programmed, it’s finally time to test the startup script. The startup script is in charge of managing our Bluetooth connections to the Wii Balance Board, resetting the Bluetooth dongle when/if necessary, and shutting down the Pi. Run the command below to get it kicked off:
sudo python startup.pyStarting up...
Ready.Test 1: Connecting to the Wii Balance Board
Let’s test the connection to the Wii Balance Board. First, if it’s not already powered on, press the Balance Board’s power button and wait for its LED to come on and stay on. Once the Balance Board is on, press our breadboard button and hold it down for a one-second (“One One Thousand”) count and release. Our status LED should flash, letting us know that it’s starting. On the console we should see the message:
Connecting to Wii Balance Board.
While it’s making the connection and after our status LED has stopped flashing, the Balance Board’s power light will flicker for a moment and then go solid again. This lets us know that it’s ready for input (to be stepped on).
At this point, you can plug the USB cable from the Atmega32u4 into a computer. In fact, with the Atmega programmed and the Pi powered up, it should be fine to connect/disconnect the Atmega Breakout Board from a computer whenever you want. However, we want it plugged in right now, so connect it to a computer and launch a text editor on the same computer. Make sure the text editor has focus, and step onto the board.
After a brief moment, you should notice the letter “o” streaming across the text editor, and our breadboard’s status LED will light up. The “o” and the status LED indicate that we’re on the Balance Board. Shift your weight slightly forward and the precession of Os will stop and you should see a “w” instead. Shifting forward, left, back and right should produce the corresponding “WASD” keys. If you lean far enough forward you may even notice a capitalized “W”, as the “left shift” sprint key will be activated. What you won’t see, however, are the diagonals represented, since text editors don’t allow for multi-letter keypresses.
With everything working, you can step off the Balance Board. You should see that our breadboard’s status LED turned off, indicating that we stepped off the Balance Board. Press the Balance Board’s power button to disconnect it from the Pi, and you should see the following on the console:
Button pressed
WiiBoard disconnected
Bus 001 Device 004: ID 0a12:0001 Cambridge Silicon Radio, Ltd Bluetooth Dongle (HCI mode)
001/004
Resetting USB device /dev/bus/usb/001/004
Reset successfulThis indicates the Wii Balance Board was disconnected correctly, and the USB dongle was cycled and is ready for future connections.
Test 2: Bluetooth Reset
It’s possible for the USB Bluetooth dongle to end up in an odd state, where it just won’t connect to to the Wii Balance Board. When/if this happens, we can reset/cycle USB dongle with a press of the breadboard’s button. To test, we’ll power on the Balance Board. After its power light is steady, press the breadboard’s button for a two-second (‘One One Thousand, Two One Thousand’) count and release. Our status LED should begin to flicker very fast. The Balance Board’s power light should turn off, and the console should read:
Restarting USB Bluetooth device.
Bus 001 Device 004: ID 0a12:0001 Cambridge Silicon Radio, Ltd Bluetooth Dongle (HCI mode)
001/004
Resetting USB device /dev/bus/usb/001/004
Reset successful
As you may have guessed, this runs the bluereset.sh script we saw earlier.
With any luck, we shouldn’t need to trigger this very often, if at all. However, if you can’t get the Balance Board to connect with a steady power light after pressing its power button, then this is the first thing to try.
Test 3: Shutting Down
At some point we’re probably going to want to shut the entire thing off, if only to conserve power, when we’re not using it. First however, we need to disconnect the Atmega32u4’s USB from whatever computer it’s plugged into. You can still leave the other end of the USB attached to the Breakout Board though. When the Pi turns off, the GPIO will get cleaned up, the startup script will exit and the Atmega32u4 will be left to float. If it’s still connected to a computer at that point, it’ll uncontrollably spew our “WASD” into whatever computer it’s connected to. So, always disconnect the Breakout Board from the computer before shutting the Raspberry Pi down.
In order to shut the Raspberry Pi down, press and hold our breadboard button (without releasing) until our Status LED starts flashing, then let go. On the console you should see:
Shutting down now.
Broadcast message from root@raspberrypi (pts/0) (Wed Nov 18 19:57:01 2015):
The system is going down for system halt NOW!
The Raspberry Pi’s status lights should all go out, minus its power light.
If everything worked successfully, you can turn the Raspberry Pi back on, by unplugging it from its power source and plugging it back in.
Startup
With everything working, all that’s left to do is to make sure our startup.sh script gets run after the Pi’s boot up process. To make our script run automatically on startup, we’ll edit the rc.local file:
sudo nano /etc/rc.local
Just before the “exit 0” line add the following on its own line:
python /home/pi/wii/startup.pyctrl x, then y, the press return to save
With that saved, we can restart the Pi with the following command:
sudo shutdown -r now
After it reboots, our statup.sh script should be running and we should be able to perform everything (Wii Balance Board Connection, USB Bluetooth reset/cycle, and Raspberry Pi shutdown) all from our breadboard’s button.
Configuration
As I mentioned earlier, I’ve provided a simple configuration file (wiiConfig.ini) to help make minor tweaks and adjustments easier. In fact, we’ve already touched this file once before, when we added the Wii Balance Board’s MAC address to it.
The configuration file is split into these three sections:
- PINS: This allows you to change the pin assignments.
- MINIMUM: This is where minimum weight/pressure is set for directional movement.
- BOARD: This is where we’re storing the Balance Board’s Mac address.
The file is also full of comments that should help with making changes.
Credits:
This project wouldn’t have been possible without some wonderful people sharing some wonderful stuff:
- A large portion of the Wii Balance Board Bluetooth communication code was taken from this exceptionally wonderful blog post by Stavros Korokithakis
- The keyboard controller code was built off of the LUFA framework
- The usbreset program was pilfered from a helpful form post on askubuntu
Disclaimer:
I am in no way responsible for anything bad that may happen as a result of anyone following anything read here or anywhere else, but if something good should happen, send a little love my way. ;)